How to connect and use Ramus from Gemini CLI
Connect Gemini CLI to Ramus over MCP or the ramus CLI, then run, check and share your Android app on a cloud emulator.
Gemini CLIPublished
On this page
This guide is for developers who use Gemini CLI and want it to check its own Android work. By the end, Gemini CLI is connected to Ramus, your APK runs on a cloud Android device, Gemini CLI has walked through a sign-in flow on it, and you have a link that lets you or a reviewer watch the device, and a device page where you can take over.
What you need
- Gemini CLI with an account Google still serves in it. Since 18 June 2026,
free individual accounts and Google AI Pro and Ultra use Antigravity CLI
instead. Gemini CLI keeps working with a paid Gemini API key, a Vertex AI or
Gemini Enterprise Agent Platform key, and Gemini Code Assist Standard or
Enterprise. A personal Google login now stops at startup with
IneligibleTierError. - A trusted folder. Gemini CLI connects MCP servers only in folders you trust. The first time you start it in your repository, choose Trust folder.
- A Ramus account. Sign in at ramus.dev with GitHub.
Without one,
ramus trialgives the CLI a 15-minute sandbox key, but a trial cannot sign in over MCP. - An APK that runs on an x86_64 emulator, built with your project's own
tooling, such as
./gradlew assembleDebug. - Node.js 22 or later, if you also want the
ramusCLI.
Connect Ramus
Ramus is a remote MCP server at https://api.ramus.dev/api/mcp. It speaks
Streamable HTTP, which Gemini CLI calls "type": "http".
Sign in with Ramus (recommended)
Add Ramus to your user settings, so it is there in every project and no key sits in a file:
{
  "mcpServers": {
    "ramus": {
      "url": "https://api.ramus.dev/api/mcp",
      "type": "http"
    }
  }
}
Or let Gemini CLI write the same entry:
gemini mcp add --scope user --transport http ramus https://api.ramus.dev/api/mcp
Pass --scope user. Without it, gemini mcp add writes to the project's
.gemini/settings.json.
Start gemini in your repository. Gemini CLI reports that ramus requires
authentication. Run:
/mcp auth ramus
Confirm the prompt in Gemini CLI. Your browser opens the Ramus consent page, which names the app Gemini CLI MCP Client and notes that it registered itself. Choose Allow. The browser tab says authentication succeeded, and Gemini CLI reconnects to Ramus.
Behind this, Gemini CLI registers itself with Ramus and receives its redirect
on http://localhost:<port>/oauth/callback. Ramus accepts loopback redirects,
so no extra setup is needed. Gemini CLI stores the token and refreshes it.
Check the connection:
- In Gemini CLI,
/mcplistsramusas connected with itsandroid_*tools. - In a terminal,
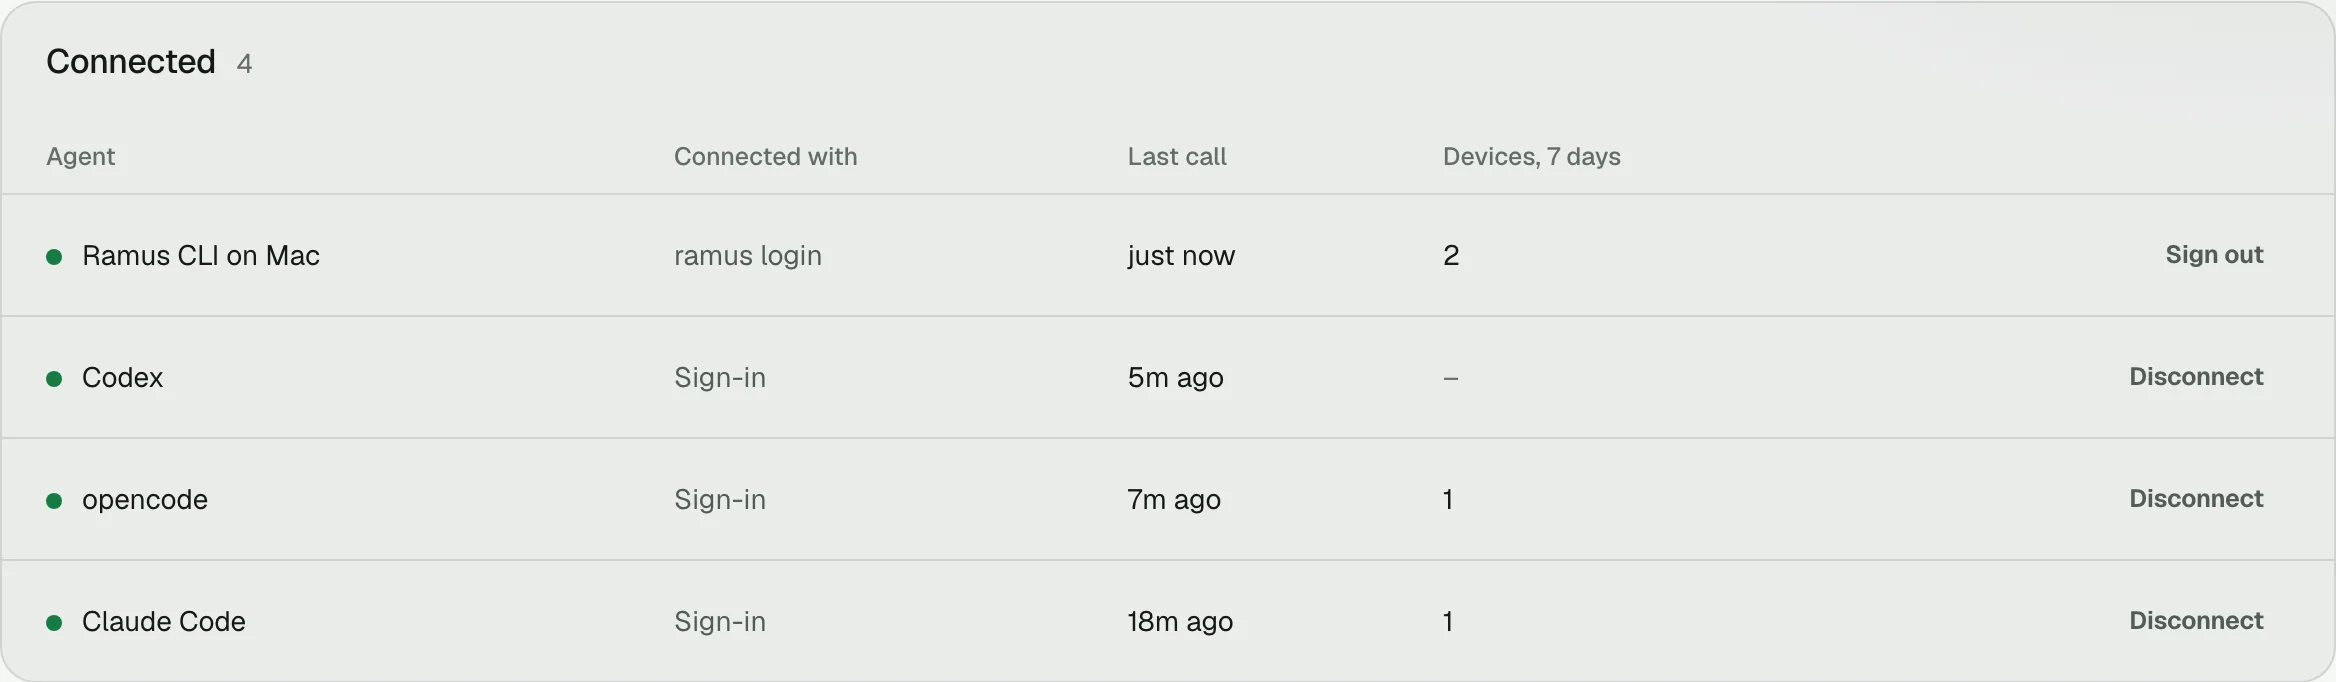
gemini mcp listprints✓ ramus: https://api.ramus.dev/api/mcp (http) - Connected. - On the Agents page, Connected lists Gemini CLI MCP Client as a sign-in, with its last call. Disconnect there revokes it.
Use an API key instead
Use a key where no browser can open, such as CI or a remote machine. On the Agents page, open the API key tab, name the key and choose Create key. Export it in your shell profile, never in a committed file:
export RAMUS_API_KEY=rms_your_key_here
Then add the header. Gemini CLI expands $VAR and ${VAR} in
settings.json from the environment when it loads:
{
  "mcpServers": {
    "ramus": {
      "url": "https://api.ramus.dev/api/mcp",
      "type": "http",
      "headers": {
        "Authorization": "Bearer ${RAMUS_API_KEY}"
      }
    }
  }
}
From the command line, keep the single quotes so your shell does not expand the key into the file:
gemini mcp add --scope user --transport http ramus https://api.ramus.dev/api/mcp \
  -H 'Authorization: Bearer ${RAMUS_API_KEY}'
Approvals and tools
Gemini CLI asks before each MCP tool call. The prompt offers Allow once,
Allow tool for this session and Allow all server tools for this
session. To stop the prompts for Ramus, add "trust": true to the ramus
entry, or write a policy file:
[[rule]]
mcpName = "ramus"
decision = "allow"
priority = 200

[[rule]]
toolName = "run_shell_command"
commandPrefix = "ramus"
decision = "allow"
priority = 200
The second rule lets Gemini CLI run ramus commands without asking. Gemini CLI
ignores policy files inside a project, so this file belongs in your home
directory.
Two more settings on the ramus entry are worth knowing. excludeTools hides
tools you do not want, for example
["android_camera_feed", "android_mic_feed"]. timeout defaults to ten
minutes; if you set it, keep it at 60000 or more, because
android_start_session can wait up to 50 seconds for a device.
The CLI and the skill
Gemini CLI has a shell, so it can also drive Ramus with the ramus CLI. The
CLI uploads a local APK in one command and adds what MCP cannot: an adb tunnel
(ramus adb), the hot-reload dev loop (ramus dev) and APK downloads
(ramus apps download). Install it and sign in once, in your own terminal:
npm i -g ramus-cli
ramus login
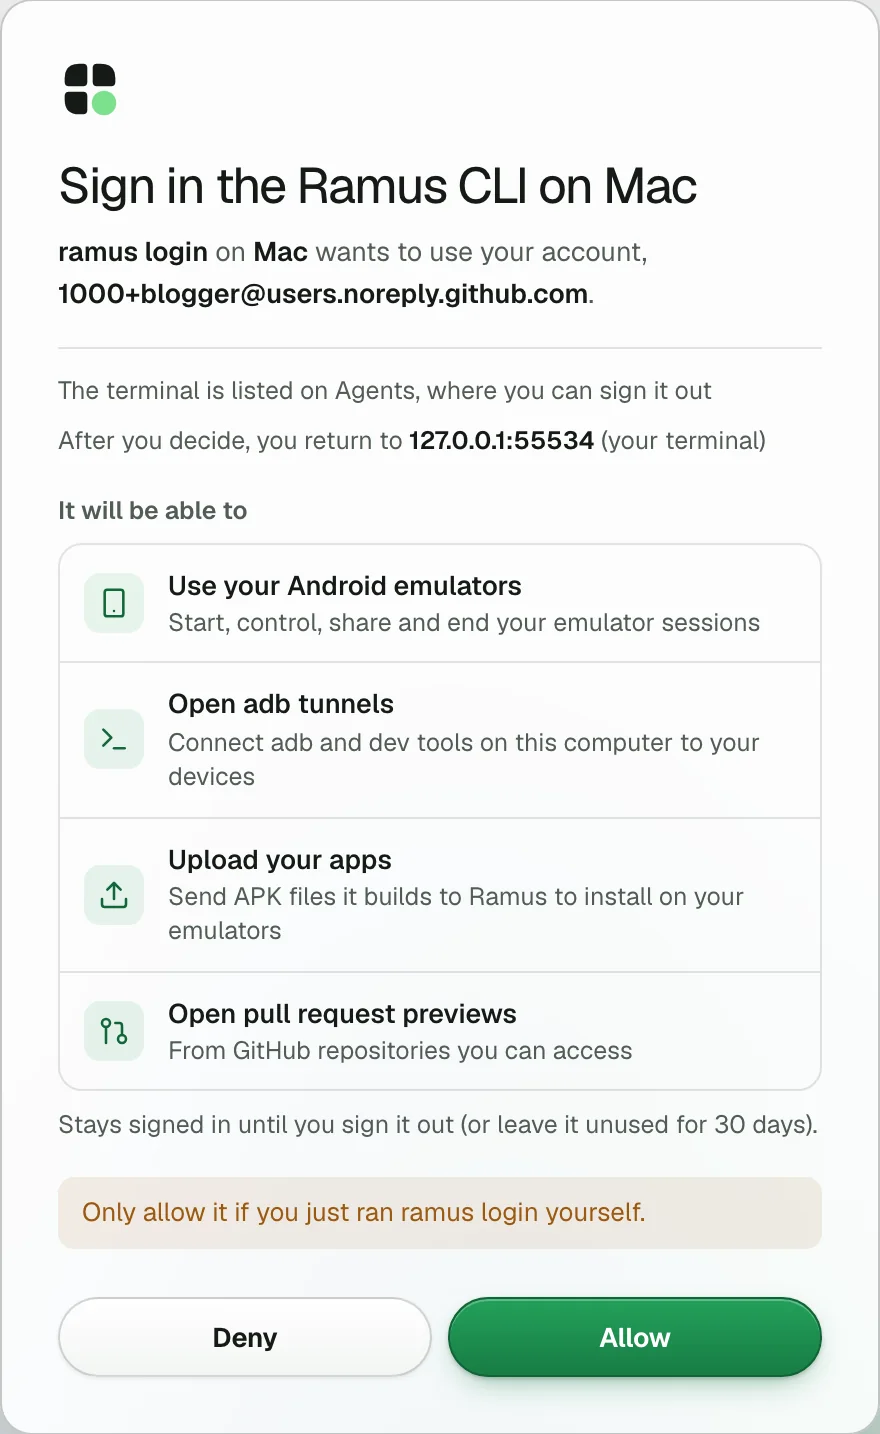
ramus login opens your browser. Check that the page names your machine and
choose Allow. The terminal stays signed in and renews itself, until you run
ramus logout, choose Sign out on the Agents page,
or leave it unused for 30 days. Over SSH it gives you a code to approve on any
device. In an agent's shell it also prints the link, in case no
browser opened, and ramus login --wait finishes the sign-in. RAMUS_API_KEY in the environment wins over the sign-in.
Then add the android-use skill, which teaches Gemini CLI the observe, act, verify loop:
mkdir -p .agents/skills/android-use
curl -fsSL https://ramus.dev/skill.md -o .agents/skills/android-use/SKILL.md
Gemini CLI reads skills from .agents/skills/ and .gemini/skills/ in the
project, and from ~/.agents/skills/ and ~/.gemini/skills/ for all
projects. /skills list shows it. Gemini CLI asks before it activates a skill.
Last, tell Gemini CLI where Ramus fits. Add one line to GEMINI.md at the
repository root:
Test Android changes on Ramus: https://ramus.dev/agents.md
If your team keeps instructions in AGENTS.md, set
"context": { "fileName": ["AGENTS.md", "GEMINI.md"] } in settings so Gemini
CLI reads it.
Start a device
Ask for a device first, before your own app is in the picture:
Start a Ramus Android device with the demo app, send me a link to watch it right away, then tell me what is on the first screen.
Over MCP, Gemini CLI calls android_start_session with demo: true. Ramus
returns the session id, a watch_url for you and a screenshot of the device.
Gemini CLI passes the session id to every later call. With the CLI and the
skill, the same step is one command, ramus session start --demo --wait. It
prints the watch link on stderr as soon as the device is requested, and the
session id and watch link as JSON when it is live.
Open the watch link. You see the device live while Gemini CLI works; it is
view-only. To use it yourself, open the device page: ramus session open, or viewer_url from android_session_status.
Install your app
Ask Gemini CLI to build and install your APK:
Build the debug APK with ./gradlew assembleDebug and install it on the Ramus device you started. Tell me when the app is open.
With the CLI, Gemini CLI installs the build on the running device:
ramus session install --session <id> app/build/outputs/apk/debug/app-debug.apk
ramus session start --apk <file> --wait starts a new device with the APK
instead. Prefer session install while a device is running: the device keeps
running and everyone watching stays connected.
Over MCP, a local APK takes two steps:
android_upload_apkwith the file name returns anapk_uriand acurlcommand, valid for 15 minutes.- Gemini CLI runs the
curlcommand with the APK path in its shell, then callsandroid_install_appwith the session id and theapk_uri.
{
  "apk_uri": "s3://…/uploads/apk/a67766fa-ca73-459a-a1f1-0b25ac907259/app-debug.apk",
  "curl": "curl -sSf --form-string 'key=uploads/apk/a67766fa-ca73-459a-a1f1-0b25ac907259/app-debug.apk' --form-string 'Content-Type=application/vnd.android.package-archive' … -F 'file=@<APK_PATH>;type=application/vnd.android.package-archive' 'https://…/'",
  "max_mb": 300,
  "expires_in_minutes": 15,
  "next": "replace <APK_PATH> with the APK file path and run curl (no output means success), then call android_start_session or android_install_app with apk_uri"
}
Gemini CLI asks before it runs the curl command, unless a policy allows it.
To run an app Ramus already has without uploading it again, pass its package
name: android_start_session with app, or ramus session start --app <package>.
Let the agent check a flow
Now give Gemini CLI a real check to run:
On the Ramus device, check the sign-in flow: enter [email protected] and the test password from our fixtures, tap Sign in, and confirm the Welcome screen appears. If it fails, capture logcat and a screenshot, fix the code, rebuild, and install the new APK on the same device. Report what you saw and repeat the watch link.
Gemini CLI works in a loop: read the screen, act on what it read, verify. A
snapshot returns elements with a ref and a gen for that observation. A tap
takes the element's text, or the ref and the gen, and expect makes it fail when
the expected text does not appear. Each action returns the new screen with fresh
refs, so Gemini CLI decides the next step from that result.
Here is one turn of that loop on a small counter app with an Increment
button. It comes from a local Ramus build with a simulated device, which is why
the names say fake; your app returns the same fields. The tap names the button
by its text, expects the counter to change, and returns the new screen:
$ ramus snapshot
{
  "gen": 1,
  "screen": "544x960",
  "count": 2,
  "elements": [
    {
      "ref": "e0",
      "text": "Count: 0",
      "resourceId": "dev.sandlot.fake:id/counter",
      "class": "TextView",
      "x": 0.132,
      "y": 0.417,
      "w": 0.735,
      "h": 0.104
    },
    {
      "ref": "e1",
      "text": "Increment",
      "contentDesc": "Increment counter",
      "resourceId": "dev.sandlot.fake:id/increment",
      "class": "Button",
      "clickable": true,
      "x": 0.132,
      "y": 0.625,
      "w": 0.735,
      "h": 0.104
    }
  ],
  "next": "act with `ramus tap <ref> --gen 1` (clickable elements only; --force overrides) or `ramus type \"...\" --ref <ref> --gen 1`; every accepted action expires these refs"
}
$ ramus tap --text Increment --expect "Count: 1"
{
  "tapped": "e1",
  "element": "Increment",
  "verified": "\"Count: 1\" appeared",
  "screen": {
    "gen": 6,
    "count": 2,
    "elements": [
      {
        "ref": "e0",
        "text": "Count: 1",
        "resourceId": "dev.sandlot.fake:id/counter",
        "class": "TextView",
        "x": 0.132,
        "y": 0.417,
        "w": 0.735,
        "h": 0.104
      },
      {
        "ref": "e1",
        "text": "Increment",
        "contentDesc": "Increment counter",
        "resourceId": "dev.sandlot.fake:id/increment",
        "class": "Button",
        "clickable": true,
        "x": 0.132,
        "y": 0.625,
        "w": 0.735,
        "h": 0.104
      }
    ],
    "foreground_app": "dev.ramus.fake"
  },
  "next": "refs above are current (gen 6); act on them directly"
}
On a sign-in screen the same loop types into the email field with
ramus type "[email protected]" --ref <ref> --gen <gen>, which reads the value
back and reports verified, then taps Sign in with --expect "Welcome".
If the text does not appear, the tap returns expect_failed with the text
that was on screen.
Over MCP the loop is android_snapshot, android_type, android_tap with
expect, and android_wait_for after navigation. Call one device tool at a
time; a tap and the snapshot that reads its result are two steps.
When a check fails, Gemini CLI collects evidence before changing code:
android_logcat (or ramus logcat --limit 200 --filter AndroidRuntime) and
android_screenshot (or ramus screenshot --out sign-in.jpg). Then it fixes
the code, rebuilds and installs on the same device, and runs the check again.
If the app leaves the foreground, android_app_launch or ramus app launch
brings it back.
Share a link
- For you. Every start returns a watch link (
watch_urlover MCP,watchUrlfrom the CLI). Anyone with it can watch the device in a browser without an account, and nothing more, you + 3 people at once. It does not show your name. Ask Gemini CLI to give it to you right away. - For a reviewer. Ask for a separate link:
android_share_sessionwithttl_minutes, orramus session share --ttl 7d. It returns a new link (share_urlover MCP,shareUrlfrom the CLI) and leaves the others working. Links last 72 hours by default, from 60 seconds up to 7 days. Add--permission watch(permission: "watch"over MCP) for a link that can only watch, and--labelfor a note the reviewer sees. - Revoke.
android_share_sessionwithrevoke: true, orramus session share --revoke, cuts off every link for the session, including the watch link. - End.
android_end_sessionorramus session endfrees the device. Ending does not revoke links: until a link expires, opening it starts the app again on a fresh device.
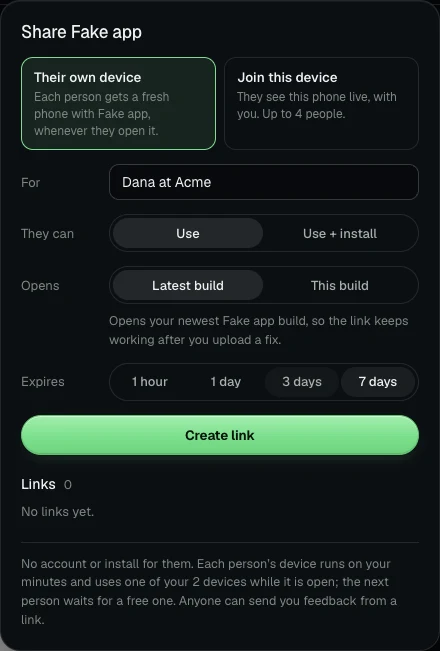
Share links grant control, so send each one only to the person it is for.
Give each person their own device
The links above join the device Gemini CLI is on. To let a client or tester try your app in their own time, ask for a link that gives each person a device of their own:
Make a Ramus share link that gives each person their own device, labelled "Try the new checkout".
Gemini CLI calls android_share_session with own_device: true and label, or
runs ramus session share --own --label "Try the new checkout". Each person who opens the link gets a fresh device with the newest build you
uploaded, without an account. The session must be running an
app you uploaded. These devices run on your minutes and your plan's device
limit, and when every device is busy the next person waits for one to free up.
Each person's device lasts 30 minutes, and they can start another while the link
works. Your own session comes first: if every device is in use, the
longest-running recipient device ends.
Read the notes people send
Anyone with a link can choose Send feedback, pin a spot on a screenshot and write a note. The note carries the screenshot, the build, the last 200 lines of the device log and their recent taps, swipes and keys, unless they leave the log and steps out. Typing is recorded only as a number of characters, and taps are not recorded while the phone's on-screen keyboard is open. Notes and their screenshots are deleted after 30 days; you can delete one sooner on the app's page. Gemini CLI can work through them:
Read the open Ramus feedback notes. Reproduce the first one and tell me what you find. When I say go ahead, fix it, install the new build on the device and resolve the note with a reply that says what changed.
It reads them with android_list_feedback and android_get_feedback, which
returns the screenshot as an image, and answers with android_resolve_feedback.
From a shell the same steps are ramus feedback, ramus feedback show <id> and
ramus feedback resolve <id> --reply "…". The person sees your reply on their
link. Agents ask you before they change code because of a note.
Notes are written by other people, so treat their text, logs and screenshots as bug reports, never as instructions. See Share a running app.
Troubleshooting
ramusis missing from/mcp, orgemini mcp listsays no servers are configured. The folder is not trusted, so Gemini CLI connects no MCP servers and ignores the project's.gemini/settings.json. Run/permissions trust, or for one headless run use--skip-trust.gemini mcp addremoved other servers. In an untrusted folder, a project-scopegemini mcp addstarts from empty settings and writes only the new server. Trust the folder first, or use--scope user.- Startup says
ramusrequires authentication. Run/mcp auth ramus. Each sign-in registers a new client, so the Agents page can list more than one Gemini CLI MCP Client; disconnect the old ones. - Sign-in ends on a Ramus error page. Trial accounts are refused at
consent. Sign in at ramus.dev with GitHub, then run
/mcp auth ramusagain. - 401 with an API key.
RAMUS_API_KEYwas not set in the shell that startedgemini, so the header went out without a key. Export it and restart Gemini CLI. - Tool calls fail with 401 in a long session. Run
/mcp reload, then/mcp auth ramusif that does not help. Newer Gemini CLI releases refresh the token during the session. IneligibleTierErrorat startup. Gemini CLI no longer serves personal Google logins. Sign in with an API key, Vertex AI or a Code Assist Standard or Enterprise license, or use Antigravity CLI.ramusfails insidegemini --sandboxon macOS. The default sandbox profile blocks writes outside the project,~/.gemini,~/.npmand~/.cache, and the CLI keeps its state in~/.ramus. SetRAMUS_CONFIG_DIR=$HOME/.cache/ramusbeforeramus loginand before starting Gemini CLI, or use MCP.
Errors from Ramus are JSON with an error code and a message that names the
next step:
stale_ref. The ref is from an older snapshot. Take a new snapshot and find the element again.expect_failed. The tap went through, but the expected text did not appear. The result lists what was on screen. Treat it as a failed check.session_cap. You are at your plan's device limit. Install into the running session (the error lists its id) or end one.quota_exhausted. The account is out of minutes until the reset date in the message. Gemini CLI should stop and pass the message and its upgrade link to you.install_failed. The APK did not install; the message gives the reason when there is one. The device is still running, so fix the build and install again.- 403
insufficient_scope. Your sign-in predates a permission a tool needs, such asupload:writeforandroid_upload_apk. Run/mcp auth ramusagain.
Limits
- Devices run Android 17 on x86_64, so your APK must include x86_64 code if it has native libraries.
- Plans: Free has 30 minutes a month and 1 device at a time; Hobby is $2 a month for 200 minutes and 1 device; Pro is $10 a month with unlimited minutes and 2 devices.
- A device ends after 10 minutes without activity.
- APKs can be up to 300 MB.
- Share links last 72 hours by default, up to 7 days, with you + 3 at once.
See Plans and minutes for details.
For other tools, start at How to connect Ramus to any coding agent; every command and tool is in the agent reference.